The user interface of the iWinSoft CD/DVD Label Maker:
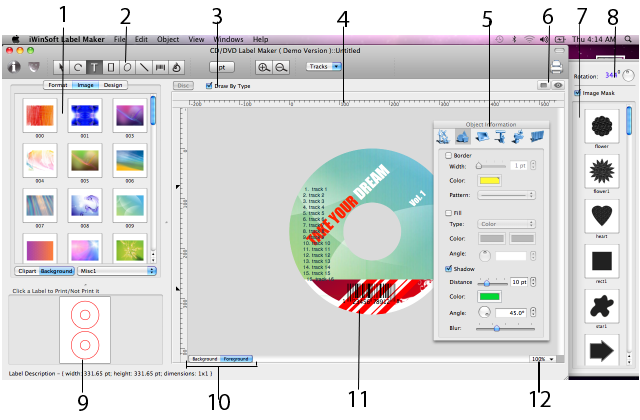
1 – Source panel. Here you can preview the content of the graphic library, label formats and layout templates.
-
Click the "Format" tab to switch into a large list of the predefined label formats windows.
Click the "Layout" or "Design" tab to switch into predefined layout templates.
3 – Draw By Type check box. Print 2 different labels one sheet at one time when unchecked.
4 – Ruler Guides are used for positioning or aligning objects.
5 – Object Information panel. To open the Object Information panel, double click on the object with the Command key pressed. you can also use the Object menu > Show Object Info, or click the Inspector button in the toolbar.
6 – Turn the preview mode on or off. This button lets you show or hide the guidelines, margins and other auxiliary marking.
7 – Image Mask panel. To open this panel, use the Object menu > Show Image Masks, or click the "Image Mask" button in the toolbar.
8 – Image angle control. Hare you can rotate angle of backgound or image.
9 – Page Preview. Hare you can specify the labels to be printed, Clicking on a label makes it gray, which means that it's excluded from the printing. One more clicking on the same label makes it printable again.
10 – The buttons that allow you to choose between the Background and layers.
11 – The edit area. Your document is displayed and edited here.
12 – The zoom control used to change the magnification of your document on the edit area.
© 2003-2011 iWinSoft, Inc. All rights reserved.